

Best ways to fix Memory Leak in windows 11 will be described in this article. Do you notice that your computer is running more slowly? Even though the computer comes with enough memory pre-installed, using multiple applications at once will slow down your PC. Then it is likely that you are experiencing a memory leak in Windows 11. I’ve covered how to determine if you’re dealing with a memory leak issue in my guide.
I’ve also covered some of the potential causes of a Windows 11 memory leak. Additionally, there are troubleshooting hints that will enable you to fix the Windows PC memory leak problem.
How Does Windows 11 Check For Memory Leaks?
To check for memory leaks on a Windows 11 computer, follow these simple steps.
On the taskbar, click the Windows search icon.
Type Resource Monitor after that.
When the relevant search results appear, click Open.
open resource tracking
Then select the tab for Memory.
View your computer’s complete amount of accessible memory.
Resource monitoring checking memory utilisation
Examine the running programmes and applications next. Examine which of them is using a lot of memory despite the fact that they might not be resource-intensive.
Why Do Memory Leak Problems Occur?
Launching several windows of File Explorer on a machine
Although you have opened certain programmes, you have not yet used them. The computer’s memory could be being used by the app while it is running in the background.
A memory leak might result from opening numerous browser tabs and not using the majority of them.
The primary cause of a memory leak may be unneeded programmes and services starting up when the machine first turns on.
For the specific build of Windows 11 installed on your PC, it might be a bug.
1. Stop the Apps That Open at the Windows Startup

Some applications launch as soon as Windows OS is activated. You can modify the settings to prevent certain applications from launching at Windows startup.
The settings can be accessed by pressing Windows + I.
Click Apps on the left-hand panel.
Then click Startup after navigating there.
startup options for apps
The list of programmes that are set to launch at system startup will be visible to you.
To prevent the corresponding apps from starting when your computer boots up, click the toggle.
Disable applications when Windows starts up
This is a fantastic approach to lessen or eliminate memory leak problems in the Windows OS. Don’t, however, disable every app that launches when the computer starts up. Just a few apps with a moderate or low impact should be disabled, as should any that you do not need. You have the choice.
2. Close the Apps that are Consuming Moere Memory
You can manually check out which Windows applications are using a lot of memory. Simply shut down those programmes and launch the ones you need right now.
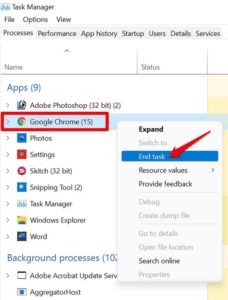
Press the Ctrl, Alt, and Delete keys to launch the Task Manager.
Check the Memory tab in the Task Manager to notice how much recollection is being used by each application.
Select the application that is using up the most memory by clicking on it, and then click End Task.
Complete a job in the Windows task management
3. Update Windows OS
Our computer’s Windows OS version might be glitchy, which would explain the memory leak problem. Maintaining your Windows 11 OS update is a smart idea.
1.To start, press Windows + I.
2.Click Windows Update on the Settings page.

3. Next, select Check for Updates.
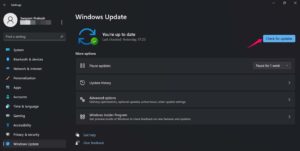
looking for updates
Click Download Now if an update is available for installation.
Install the Windows 11 upgrade.
Check to see if the memory leak issue still exists after applying the update.
4. Close file Explorer
Closing the numerous file explorers you’ve had open but only used one or two of is one of the multiple basic things you can fix to address memory leak concerns.
Frequently, you simply set your PC to sleep and continue working on it the next day rather than shutting it down completely. The File Explorer windows continue to be open throughout. When you return to your work later, you open more File Explorer windows to access other folders. All of this aggravates memory leak problems.
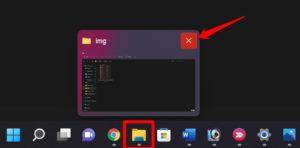
Simply move the mouse pointer above the taskbar’s File Explorer icon. The taskbar will be shown over all of the File Explorer windows, which will be highlighted.
Click the “x” to close any open File Explorer window.
Shut down file explorer
5. Launch Folders in Separate Windows
Here is a different solution to the computer’s memory leak fix. You can choose to have file explorers open folders in different windows. Also check Types of software error
- On the taskbar, click the Windows search icon.
2. Type File Explorer Options next.
3.Click
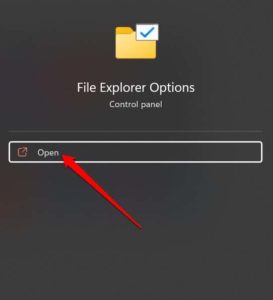
4.Then choose it by going to the View tab.
5.Select the box next to Launch Folder Windows on Separate Process under Advanced Settings.
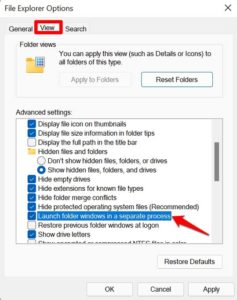
6. To save the modifications, click OK after selecting Apply.
6. Close Apps and Services that Your Are Not Using

I’ll advise you to shut down any inactive programmes. Use only one software at a time, such as Adobe Photoshop, and avoid running numerous programmes simultaneously. Don’t leave the app open after you’ve finished using it. Shut it. It applies to all programmes that are set up on your computer. Also check window 10 update error 0x80003ee
Additionally, just open as many browser tabs and windows as you need. Close any that are not necessary. Your computer’s memory will be better preserved if you do that.
These therefore are the different methods you can use to fix the memory leak problem on Windows 11. Try them out, and if you own any queries, let me know.
Please depart a remark below if you have any comments on How to Fix Memory Leak in Windows 11. Additionally, for video instructions, kindly subscribe to our DigitBin YouTube channel.