

Best methods to take a screenshot in window 10 will be explained in this post. The saying “a photograph is worth a thousand phrases” is quite widespread.
The value of the ideal screenshot might possibly be higher.
You never understand when you strength need to rapidly grab your screen, whether you’re attempting to show off a memorable moment from a video game or capture a piece of a programme to add to your report.
Best 4 Easy Methods to Take a Screenshot in Windows 10
Best 4 Easy Methods to Take a Screenshot in Windows 10 are explained here.
Method 1: Using ShareX

A free and open source tool to record your computer screen is called ShareX.
It surpasses all built-in screen capture tools due to its versatility and capacity for video capture. Also check coinDX for buy and sell crypto currency
Installing it after downloading it from https://getsharex.com
Obtain shareX
Simple keystrokes can be used with ShareX to quickly take and store screenshots.
The easiest way to save memorable video gaming moments is with this method because it will do so automatically each time the hotkey is pressed.
The shareX keypress
The entire screen will be captured when you press the Print Screen key.
To screenshot a part of the net, press Ctrl and Print Screen.
To quickly record your screen, press Ctrl + Shift + Print Screen.
The documents are automatically saved in a ShareX folder in My Documents.
Method 2: Using the Print Screen Key
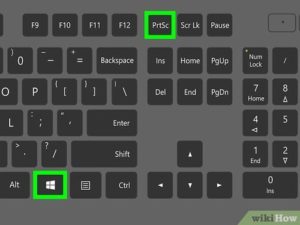
A Print Screen key can be found on almost every keyboard.
It will typically be shortened to PrtSc or PrtScr.
It won’t seem to do much if ShareX isn’t installed when you hit.
When you click it, Windows will save the current screen to your computer’s copy buffer.
In another programme, you can then paste it.
SysRq PrintSc prt scr
Scrn Print SysRq
For instance, open Paint and press the print screen key.
The contents can then be edited by pasting them.
This works good for single captures, but it can be time-consuming if you need to take several screenshots back to back.
Method 3: The Snipping Tool
Windows comes with a Snipping Tool that may be used to screenshot certain areas of the screen.
It features a built-in pen and highlighter tool and works well for small areas of the screen.
You can export your snip using the Save or Copy options.
Copy or Save Buttons
Method 4: Using Snip & Sketch

Snip & Sketch, a brand-new snipping tool, is part of Windows 10 October Update 1809.
Instead of an outdated Win32 application, this is a contemporary Windows App.
To fix Windows Update that is stuck at 0, see also:
Sketch and Snip
To take a snip instantly, in 3 seconds, or in 10 seconds, use the New button.
The majority of items can be captured in this way, but you must act quickly.
New Snip button
You can export your snip using the Save or Copy options. Also check window 10 update error 0x80003ee